PART 1. SELF HOST SUPABASE
1. What’s supabase
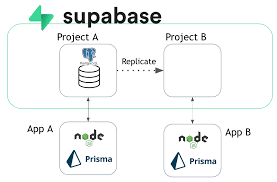
Supabase is an open-source alternative to Firebase. It provides a suite of tools for building scalable and secure web and mobile applications, including authentication, real-time database, and storage. Supabase is built on top of open-source technologies, and it aims to provide an easy-to-use platform for developers that is also affordable and flexible. One of the main features of Supabase is its real-time capabilities, which enable developers to build reactive and collaborative applications.

- Kong is a cloud-native API gateway.
- GoTrue is an SWT based API for managing users and issuing SWT tokens.
- PostgREST is a web server that turns your PostgreSQL database directly into a RESTful API
- Realtime is an Elixir server that allows you to listen to PostgreSQL inserts, updates, and deletes using websockets. Realtime polls Postgres’ built-in replication functionality for database changes, converts changes to JSON, then broadcasts the JSON over websockets to authorized clients.
- Storage provides a RESTful interface for managing Files stored in S3, using Postgres to manage permissions.
- postgres-meta is a RESTful API for managing your Postgres, allowing you to fetch tables, add roles, and run queries, etc.
- PostgreSQL is an object-relational database system with over 30 years of active development that has earned it a strong reputation for reliability, feature robustness, and performance.
Hmm. supabase + firebase ⇒

Suppa hot fireeee !!!
2. Prestiques
- Docker: https://lilhuy.notion.site/DOCKER-BASIC-49140e82541e46d98137309c43698d93?pvs=4
- Git: if you don’t know what is it maybe you should skip this blog
- Platform: ubuntu (actually a light sail aws, you can try to use any platform just need to install docker)
- Javascript, react, es6 (for part 2)
3. Let’s go
# Get the code
git clone --depth 1 https://github.com/supabase/supabase

# Go to the docker folder
cd supabase/docker

# Copy the fake env vars
cp .env.example .env

# Start
docker compose up
- Go to localhost:3000

Tada… now you’ve hosted success your fire base clone. Let’s build chat app with it !!!
Nahhhh hold up bro!!!

the .env from .env.example is just for demo. In real production app if you use this env prepare yourself to die
So next step is
4. Secure your supabase
4.1 Change API JWT
https://supabase.com/docs/guides/self-hosting/docker#securing-your-setup follow this link to generate anon key and service key for your supabase**,** You need a JWT secret. it can be what ever you want or can use any tool to generate. Then use this jwt secret and the tool to generate anon key and service key
You also need to change postgres password. Chose a super strong password!!!
Recap: we need 4 keys: JWT_SECRET which can generate the ANON_KEY and the SERVICE_ROLE_KEY and last one is POSTGRES_PASSWORD.
after have these 4 keys replace the value in
.env:ANON_KEY– replace with ananonkeySERVICE_ROLE_KEY– replace with aservicekeyPOSTGRES_PASSWORD: the password for thepostgresrole.JWT_SECRET: the jwt secret that you chose at step above

volumes/api/kong.ymlanon– replace with ananonkeyservice_role– replace with aservicekey

Now, let’s docker compose up. Recap: the dashboard (supabase studio) running at port 3000 the Kong api (for serverless function) running at port 8000
TADA: now you’ve hosted your fire base lol
OOOPPS ERROR ?


What we have done ? We updated our .env file with new api key and new database password then we try to run docker composer up again then you can’t use anything 😀. Don’t worry. It turns out supase docker-compose file persist the database’s data in volumes folder (it make sens because we don’t want to lose all data in database when we restart our container)

So when we first run docker compose up using the .env file that copied from .env.example at step 1. The old config with the old password have been saved in volumes folder. That why when we update the postgres password then re run container we get this error.
SOLUTION: DESTROY EVERYTHING (or just delete the data volumes 😀)
docker system prune -a
sudo rm -rf docker/volumes/db/data
THEN RUN AGAIN
docker compose upOK now enjoy your SUPA HOT FIRE !!!!

Yeah look nice no errors but calm down, we are not done yet. Let’s complete it
5. Config SSL, secure dashboard
At this point we can access the dashboard and edge function but it a HTTP connection no HTTPS mean that you can not do anything in a production web app. Stupid right.
So, there are some ways to fix it. You can refer to the official docs here which use the caddy server: https://supabase.com/docs/guides/self-hosting/docker#exposing-services
So let follow this instruction
- First, purchase your domain of course money go first or if you already have just use it.
- Install caddy (for ubuntu)
sudo apt install -y debian-keyring debian-archive-keyring apt-transport-https
curl -1sLf 'https://dl.cloudsmith.io/public/caddy/stable/gpg.key' | sudo gpg --dearmor -o /usr/share/keyrings/caddy-stable-archive-keyring.gpg
curl -1sLf 'https://dl.cloudsmith.io/public/caddy/stable/debian.deb.txt' | sudo tee /etc/apt/sources.list.d/caddy-stable.list
sudo apt update
sudo apt install caddy- Modify the
Caddyfileat./docker/deploy/caddy/Caddyfile.- Replace
localhostwith your domain. - Uncomment the “Dashboard” section if you want to expose the Supabase Dashboard. You MUST set a password for this to be secure.
- Replace
- Stop the currrent runing caddy server: sudo systemclt stop caddy. If you dont want to get some error like port xx have been used,…
- Run
caddy run --config ./docker/deploy/caddy/Caddyfileto start Caddy.
Nah but it not work for me. no idea(I’m just too lazy to learn caddy, my first impression is that Caddy config File is more simple than nginx config file), but let’s try nginx reverse proxy
NOTICE: the dashboard is now open for everyone who have the url so that why we need to setup the baisc auth to secure our dashboard (you can see it in the caddy config file at the caddy way above)
Now my way, nginx’s timeeeeeee
- Purchase your domain and use cloudflare sites to proxy it to your host ip. FREE SSL!!!!
- Install ngiinx
- bonus: uninstall caddy
sudo rm /etc/apt/sources.list.d/caddy-stable.list
sudo apt remove caddy
#install nginx
sudo apt install nginx
#check status
systemctl status nginx
# stop apache 2 if needede
sudo apachectl stop
# restart nginx
sudo systemctl restart nginx- Ok, let config nginx server
- What we’ll do: First, proxy pass the path / to localhost:3000 which is the supabase studio
- Proxy pass the path /proxy to localhost:8000 where the api is running. And also rewrite the /proxy to / (you dont need to name it proxy, You can name it any thing you want but it should not be /api if you dont want to be conflicted)
sudo vim /etc/nginx/sites-available/supabase
- Patse it in config file
server {
    listen 80;
    server_name yourdomain.com;
    add_header X-Frame-Options "SAMEORIGIN";
    add_header X-XSS-Protection "1; mode=block";
    add_header X-Content-Type-Options "nosniff";
    # dashboard
    location / {
        proxy_pass http://tsmc.info:3000;
    }


    # kong rest api
    location /proxy {
        proxy_pass http://tsmc.info:8000;
				rewrite ^/proxy/?(.*)$ /$1 break;
    }
}- save the file use esc :wq (just vim basic)
- Then create a sympol link to sites-enabled
# create symbol link
sudo ln -s /etc/nginx/sites-available/supabase /etc/nginx/sites-enabled/
# test
sudo nginx -t
# reload
sudo systemctl reload nginx
- now visit your domain you should access to dashboard and use /proxy will access to api. You can check the default hello edge function: https://<your-domain>/proxy/functions/v1/hello.
- Result:

- Ok now let’s add basic autithencation to secure our dashboard, you don’t want some stupid guys go in your dashboard then drop all databases right?. We don’t need to secure the kong api at the /proxy path cause it make more sense to public it and it’s no harm when you public it
- Create password file
#install packahe for password generation
sudo apt-get install apache2-utils
#username is supabase
sudo htpasswd -c /etc/nginx/.htpasswd supabase
#check
cat /etc/nginx/.htpasswd
- Update nginx file
server {
    listen 80;
    server_name lilhuy-supabase.click;
    add_header X-Frame-Options "SAMEORIGIN";
    add_header X-XSS-Protection "1; mode=block";
    add_header X-Content-Type-Options "nosniff";
    # dashboard
    location / {
        proxy_pass http://tsmc.info:3000;
        auth_basic "LilHuy Supbase Login";
        auth_basic_user_file /etc/nginx/.htpasswd;
    }


    # kong rest api
    location /proxy {
        proxy_pass http://tsmc.info:8000;
        rewrite ^/proxy/?(.*)$ /$1 break;
    }
}- Reload sudo service nginx reload
NOW when you go to dashboard url, browser will add you to provide username and password

Nice, last step you can consider to do is setup mail server in .env file Using gmail server or anything else. Here. im using gmail server. And also the SITE_URL variable
#NOTICE: not the dashboard domain this site url will be redirected
# when verify email succes
# if this value is blank it will redirect to studio dashboard
# you can create a success page then set redirect to it
SITE_URL=https://<your_app_domain>
#actually i dont know what this key for but just setup it like this
API_EXTERNAL_URL=https://<your_domain>/proxy
SUPABASE_PUBLIC_URL=https://<your_domain>/proxy

## Mailer Config # add /proxy pass for all mail link live or not will see 404 error
MAILER_URLPATHS_CONFIRMATION="/proxy/auth/v1/verify"
MAILER_URLPATHS_INVITE="/proxy/auth/v1/verify"
MAILER_URLPATHS_RECOVERY="/proxy/auth/v1/verify"
MAILER_URLPATHS_EMAIL_CHANGE="/proxy/auth/v1/verify"
#gmail server setup
SMTP_ADMIN_EMAIL=<your-email>
SMTP_HOST=smtp.gmail.com
SMTP_PORT=587
SMTP_USER=<your-email>
SMTP_PASS=<your-app-password>
SMTP_SENDER_NAME=<your-app-name>
if you don’t setup these env you’ll see some localhost email like this. Stupid right ?

- Save the .env file then docker compose down && docker compose up -d to restart supabase
TADA now, no more hold upp. No rickroll. Let’s just enjoy your free firebase LOL 😀

PART 2 USE YOUR SUPABASE
Have you celebrated enough? Now, let learn some supabase basics and build something fun with it ****
RECAP: what we’ve done in part 1. We host a supabase service on our own machine (hosting. vps,..) the supabase have 2 entry point. the dashboard running at port 3000 that we nginx proxy pass the / path to . The kong rest api(which most use to develop application) running at port 8000 which we can access by using the path /proxy
- <your-domain>: supabase studio dashboard
- <your-domain>/proxy: supbabase kong rest api
Recommandation: visit official docs, or take a look with these example in the dashboard.https://supabase.com/docs/reference/javascript/introduction

- The vanilla js example project is nice we also have real time chat app with nextjs feel free to build anything now, or follow me for some next stupid stuffs
- If you’re fireship fan like me maybe you’ve already watched this video when first learning the firebase
Now let build a chat app in 7 minutes with fire…. ah not… with SUPA BASEEEEEEEEEEE. This is result, quite neat right

- Live-demo: https://supabase-simple-chatapp.vercel.app/
- source code: https://github.com/lilhuy0405/supabase-simple-chatapp
- Ok let’s start
# create a reacc typescript using yarn and vite
yarn create vite

#install dependencies
yarn add @supabase/supabase-js
#start the server
yarn dev- Clean the boilerplate code that vite created
- create a env file to save your config
VITE_SUPABASE_URL="https://<your-domain>/proxy"
VITE_SUBABASE_KEY="YOUR ANON KEY"
- the src/vite-env.d.ts file
interface ImportMetaEnv {
    readonly VITE_SUPABASE_URL: string;
    readonly VITE_SUPABASE_KEY: string;
    // more env variables...
}

interface ImportMeta {
    readonly env: ImportMetaEnv
}- create database: go to supabase dashboard at database section add new table and name it message

- Remember to check at checkbox Enable Real Time then Hit save button
- Enable RLS – it’s something like firebase rules (read more here: https://supabase.com/docs/learn/auth-deep-dive/auth-row-level-security) . For simple just chose Enable insert for authenticated users only template. That means only login user can send messages. It’s make sens right. Then you should add another rule using the anyone can read the data template so later we can fetch the data if you not add this rule then you try to query the data it always return empty array.
- Now just took a look at the source code; https://github.com/lilhuy0405/supabase-simple-chatapp
- Some explanations
- First we create a utils to connect our supabase, in supabase.ts. Using the createClient() function
import { createClient } from '@supabase/supabase-js'
console.log(import.meta.env.VITE_SUPABASE_URL);
console.log(import.meta.env.VITE_SUPABASE_KEY);

// Create a single supabase client for interacting with your database
export const supabase = createClient(import.meta.env.VITE_SUPABASE_URL, import.meta.env.VITE_SUPABASE_KEY);- Here is how we check that user logged in or not. App.tsx file
const [user, setUser] = useState<any>(null);
  const fetchUser = async () => {
    try {
      const {
        data: { user },
        error,
      } = await supabase.auth.getUser();
      if (error) throw error;
      if (user) {
        setUser(user);
      }
    } catch (err) {
      console.log(err);
    }
  };
useEffect(() => {
    fetchUser();
  }, []);

<section>
        {user ? <ChatRoom user={user} /> : <SignIn onSuccess={fetchUser} />}
</section>- Here is how we sign in and sign up user
const handleSignIn = async () => {
    try {
      const { error: loginError } = await supabase.auth.signInWithPassword({
        email,
        password,
      });
			// do some things
    } catch (err) {
      console.log(err);
    }
  };
  const handleSignUp = async () => {
    try {
      const { data: signUpData, error: signUpError } =
        await supabase.auth.signUp({
          email,
          password,
        });
			//do somethings
    } catch (err) {
      console.log(err);
    }
};- Here is how we logout user
const { error } = await supabase.auth.signOut();- Sent messages
const { error } = await supabase.from("messages").insert({
        text: formValue,
        user_id: user.id,
        sender_name: user.email,
        created_at: new Date(),
});- Fetch messages in real time
const fetchMessages = async () => {
    try {
      //show last 50 messages
      const { data, error } = await supabase
        .from("messages")
        .select()
        .order("created_at", { ascending: true })
        .limit(50);
      if (error) throw error;
      setMessages(data);
    } catch (err) {
      console.log(err);
    }
  };
//listen for new messages
  useEffect(() => {
    const chanel = supabase
      .channel("public:messages")
      .on(
        "postgres_changes",
        { event: "*", schema: "public", table: "messages" },
        async () => {
          await fetchMessages();      )
      .subscribe();
    return () => {
      supabase.removeChannel(chanel);
    };
}, []);- Visit the docs for more informations
- Here is some notes:
- Supabase js client library save jwt of user when login success in local storage that why supbabase know that user logged in or not
- You will get error something like: can not etablish web socket …When try to fetch mesages in real time.Then try to check the network tab too check the HTTP CODE. the error code is 426 HTTP error code.This error happenned because we do not allow nginx to listen from web socket yet.
- Add these lines to your nginx server block
proxy_http_version 1.1;
proxy_set_header Upgrade $http_upgrade;
proxy_set_header Connection "upgrade";- here is the full nginx file
server {
    listen 80;
    server_name your-domain-name;
    add_header X-Frame-Options "SAMEORIGIN";
    add_header X-XSS-Protection "1; mode=block";
    add_header X-Content-Type-Options "nosniff";
    # dashboard
    location / {
        proxy_pass http://tsmc.info:3000;
				auth_basic "LilHuy Supbase Login";
        auth_basic_user_file /etc/nginx/.htpasswd;
    }


    # kong rest api
    location /proxy {
        proxy_pass http://tsmc.info:8000;
				# enable websocket
				proxy_http_version 1.1;
        proxy_set_header Upgrade $http_upgrade;
        proxy_set_header Connection "upgrade";
				rewrite ^/proxy/?(.*)$ /$1 break;
    }


}
Nice, now you can chat with your selt lol :))))
- Here’s a live demo: https://supabase-simple-chatapp.vercel.app/
- Source code if you want to copy something: https://github.com/lilhuy0405/supabase-simple-chatapp. Leave me a star if you like this tutorial
Conclusion
In conclusion, self-hosting Supabase can be a great option for those who want to have more control over their application’s infrastructure.FRE FIREBASEEEEEEE and it’s legit. With the help of tools like Caddy or Nginx, it is possible to expose Supabase services to the internet securely. Once set up, Supabase provides a powerful backend for building real-time applications with features such as authentication, authorization, and real-time data synchronization. With a bit of effort, it is possible to build a fully functional chat application in just a few minutes using Supabase.
Next step and maybe a to do list for my self
- Custom call back url when email verification sucess. Now it will redirect back to dashboard (stupid)
- Add Oauth so we can login some provider like google login,…
References
Supabase documentation: https://supabase.com/docs/
Supabase Github repository: https://github.com/supabase/supabase
Caddy official website: https://caddyserver.com/
Nginx official website: https://www.nginx.com/
Cloudflare official website: https://www.cloudflare.com/
Vite official website: https://vitejs.dev/
React official website: https://reactjs.org/
TypeScript official website: https://www.typescriptlang.org/
Docker official website: https://www.docker.com/
_CodingCat 2023_