In previous part, we learn some basics k8s concepts. But we not do something real with it yet. So in this blog, let’s see how we can deploy our application to our microk8s cluster with the built-in microk8s registry.
Table contents
- Part 1: My first time deploy a web to a aws cloud service
- Part 2: Docker and containerization
- Part 3: K8s and the new world of container orchestration
- Part 4: Deploy your express application to k8s
- Part 5: Networking with K8s is f***ing hard
- Part 6: From the cloud to ground: Physical server setup for a private cloud
- Part 7: From the cloud to ground: Install Ubuntu Server and Microk8s
- Part 8: From the cloud to ground: Harvester HCI for real world projects
- Part 9: From the cloud to ground: Private images registry for our private cloud
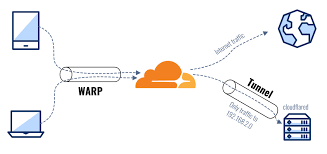
- Part 10: From the cloud to ground: Accept outside world traffics via Cloudflare tunnel
- Part 11: From the cloud to ground: CI/CD with git hub runners
- Part 12: Monitoring and debugging with Open Observe and lens
1. Create our application container
- k8s is a container orchestration tool so first, we need to build our application container. let’s build a simple hello world express application
- Create a node js file via
npm init --ythennpm i expressthen create a main.js file like-this
const express = require('express')
const app = express()
const port = 3000

app.get('/', (req, res) => {
  res.send('Hello World!')
})

app.listen(port, () => {
  console.log(`Example app listening on port ${port}`)
})
- Now if you run
node main.jsyou should see your app running at localhost:3000. - Now build your container image create a Dockerfile then paste this code
FROM node:18-alpine

#Change directory
WORKDIR /app

# cache node_modules
COPY package.json .

# run command to install packages
RUN npm install

# copy my source code
COPY . .

# set port
EXPOSE 3000


# run command to start the server
CMD ["node", "main.js"]- Build your image with
docker build -t hello-express .This command will build a docker image with namehello-express. Now you can test your docker image by run it.docker run -it -p 3000:3000 hello-express. Open localhost:3000 and you should see your app running
2. Push our image to built-in registry
- Ok, now let’s talk a bit about the image registry. at this moment your micro k8s cluster can only pull image from the public dockerhub registry. So you can push your image to dockerhub. But in real world we should use a private registry. Microk8s support a local registry so you can push image to and microk8s will know to pull from it. https://microk8s.io/docs/registry-built-in
- Enable microk8s local registry
microk8s enable registry- Now your image must be tagged with localhost:32000 to push to this registry. Let’s tag our existed image
docker tag hello-express localhost:32000/hello-express- At this point if you try the the command
docker push localhost:32000/hello-express. The docker will show an error about ssl certificate. This due to the registry host here (localhost) does not have ssl certificate (no https). We need to edit/etc/docker/daemon.jsonand add:
{
  "insecure-registries" : ["localhost:32000"]
}- Then restart the docker
sudo systemctl restart docker. Ok now you can push image to microk8s built-in registry via
docker push localhost:32000/hello-express3. Create deployment
- In last blog, we know that we can create deployment via kubectl like kubectl create deployment. But writing a lot of command to config our deployment is not a smart way to do it. Actually we need to create a yaml file to define all config about our deployment then just apply it to our k8s cluster. Create a file name deployment.yaml then paste this code
---
apiVersion: v1
kind: Namespace
metadata:
  name: hello-express
---
apiVersion: apps/v1
kind: Deployment
metadata:
  name: hello-express

  namespace: hello-express
spec:
  replicas: 1
  selector:
    matchLabels:
      app: hello-express
  template:
    metadata:
      labels:
        app: hello-express
    spec:
      containers:
        - name: hello-express
          image: localhost:32000/hello-express
          ports:
            - containerPort: 3000
---
This yaml file tell k8s cluster to create deployment name hello-express inside namespace hello-express and use the localhost:32000/hello-express to create container runtime. To apply this config to k8s type
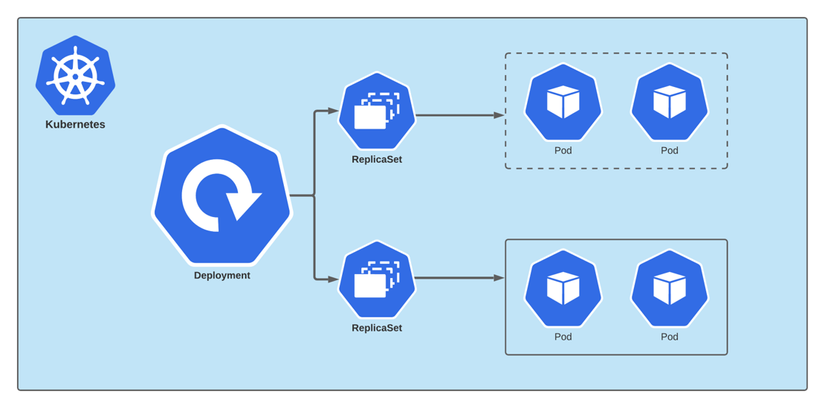
kubectl apply -f deployment.yamlNow if you type kubectl get pods --namespace=hello-express. You’ll see your pod is running with your hello-express container

But at this point you can not access our application because we not setup service to expose the pod network to outside.
4. Expose application using services
- In last blog, i explained that we have 3 basics services: ClusterIp, NodePort and LoadBalancer. Now let’s try to access to our express app using ClusterIP. Create a file name services.yaml then paste the below code
apiVersion: v1
kind: Service
metadata:
  name: hello-express
  namespace: hello-express
spec:
  selector:
    app: hello-express
  type: ClusterIP
  ports:
    - protocol: TCP
      port: 3000
targetPort: 3000- Ok this file create a service name hello-express which will match the deployment hello-express that we’ve created. Type is ClusterIp and expose the port 3000 of container to that IP
kubectl apply -f service.yaml- Ok now when you get the information about service via this command
mkctl get svc --namespace=hello-express(svc is short for service) you’ll get

- A ip eg here is 10.152.183.30. This ip is a internal k8s cluster ip. This ip can access from all node in k8s cluster. but the outside world can not access to it. Because we’ve installed microk8s to our machine. So our computer is a k8s node then we can access this ip. Type your cluster ip follow with port 3000 in browser to access your app.
- Tada, now you’ve hosted your application to k8s. But how about you want to expose this app outside not by using the clusterip ? you can try the NodePort service change your service.yaml file like this
apiVersion: v1
kind: Service
metadata:
  name: hello-expressPart 5: Networking with K8s is f***ing hard
  namespace: hello-express
spec:
  selector:
    app: hello-express
  type: NodePort
  ports:
    - protocol: TCP
      port: 3000
      targetPort: 3000
nodePort: 30300- Kubernetes assigns a port number from a predefined range of 30000-32767. Additionally, we can specify a custom port number by adding the nodePort field to the service definition
- Now apply it and try to open localhost:30300 or 0.0.0.0:30300. When service is expose to 0.0.0.0 Theoretically, it can be expose to outside internet world
- A little tips here you can merge 2 yaml file (the deployment.yaml and the service.yaml) into one single file using the — as the separator like this. Here is a full yaml file for this blog
---
apiVersion: v1
kind: Namespace
metadata:
  name: hello-express
---
apiVersion: apps/v1
kind: Deployment
metadata:
  name: hello-express
  namespace: hello-express
spec:
  replicas: 1
  selector:
    matchLabels:
      app: hello-express
  template:
    metadata:
      labels:
        app: hello-express
    spec:
      containers:
        - name: hello-express
          image: localhost:32000/hello-express
          ports:
            - containerPort: 3000
---
apiVersion: v1
kind: Service
metadata:
  name: hello-express
  namespace: hello-express
spec:
  selector:
    app: hello-express
  type: NodePort
  ports:
    - protocol: TCP
      port: 3000
      targetPort: 3000
      nodePort: 30300
---
Conclusion
Ok, that’s how we deploy our application to our k8s. And use services to expose our application to the internet. But that way is not the real world practice. In real world application we don’t use nodeport to expose our application cause we now need to manage the port :v, etc… So in next blog let dive deep into the k8s services and see what suppose to be the best way to expose our application: Part 5: Networking with K8s is f***ing hard. Thanks for reading. See you guys in next blog.
__Coding Cat__