In the previous series we know how to use Docker as the beginner pack for devops. But for real world problems. Only Docker can not solve all problems eg: scale containers runtime, or when you need to deploy a lot of services you need a tool to manage all of them (manage network, volumes,..). This is when the Kubernetes or K8s’ll help us. K8s at first glance is fuckin hard :))). Well you need to learn a lot of new concepts. But at the end of the day you just working with all yaml files :v

Table contents
- Part 1: My first time deploy a web to a aws cloud service
- Part 2: Docker and containerization
- Part 3: K8s and the new world of container orchestration
- Part 4: Deploy your express application to k8s
- Part 5: Networking with K8s is f***ing hard
- Part 6: From the cloud to ground: Physical server setup for a private cloud
- Part 7: From the cloud to ground: Install Ubuntu Server and Microk8s
- Part 8: From the cloud to ground: Harvester HCI for real world projects
- Part 9: From the cloud to ground: Private images registry for our private cloud
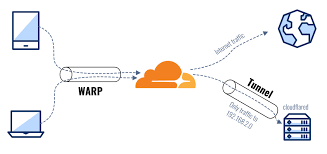
- Part 10: From the cloud to ground: Accept outside world traffics via Cloudflare tunnel
- Part 11: From the cloud to ground: CI/CD with git hub runners
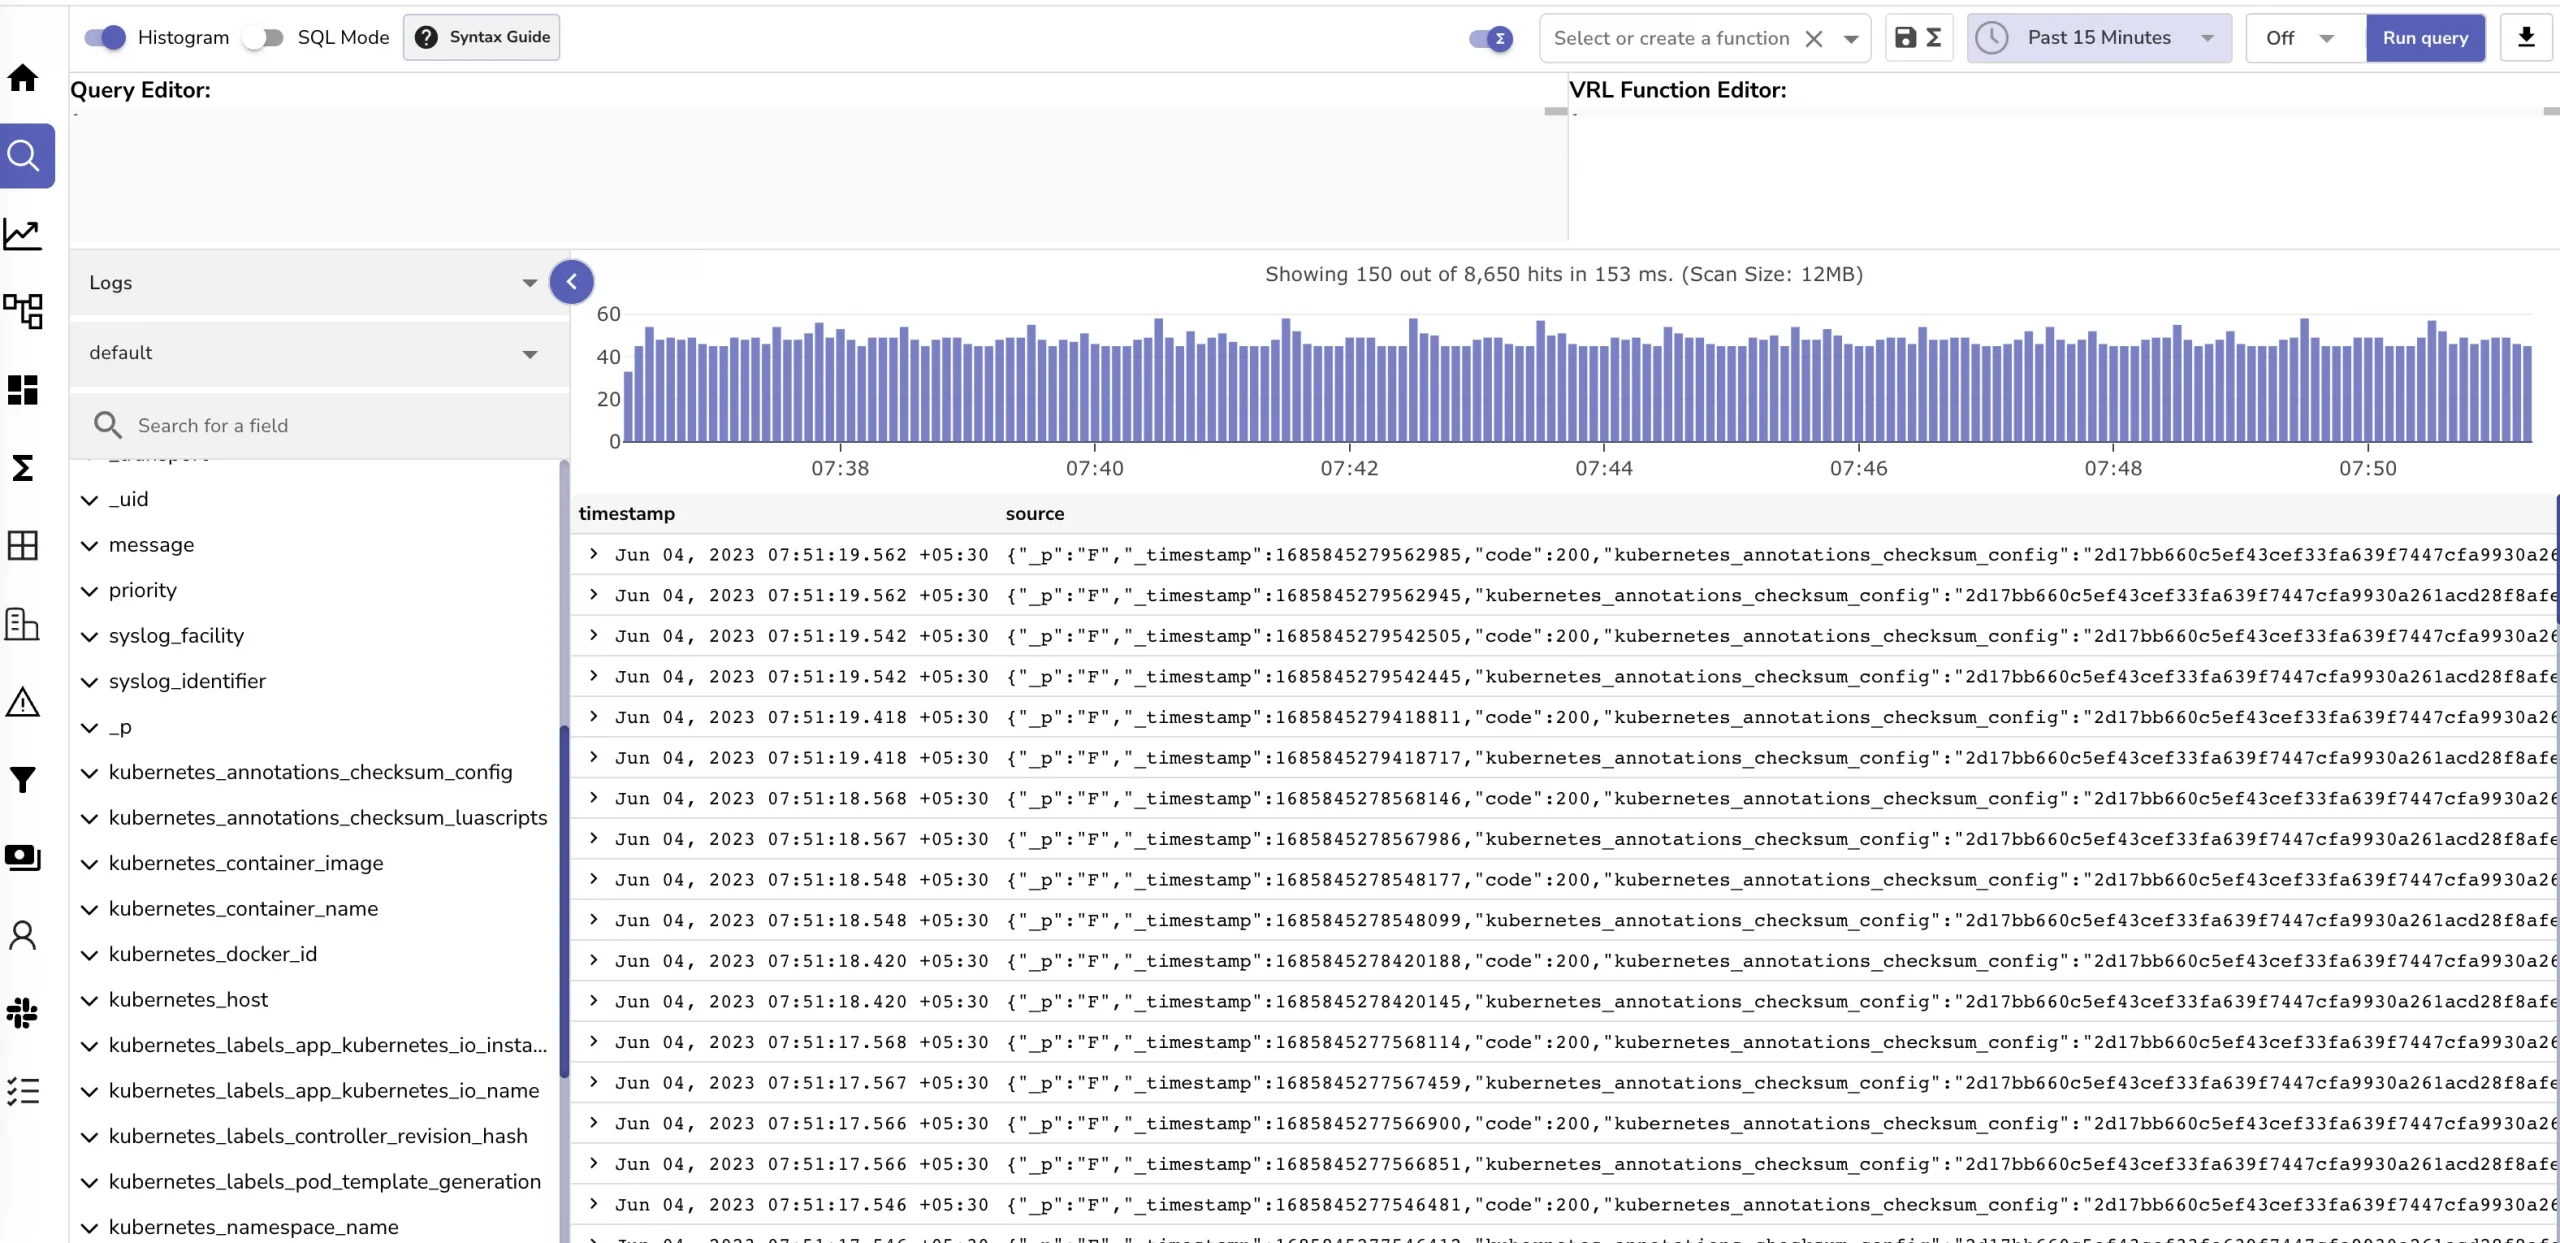
- Part 12: Monitoring and debugging with Open Observe and lens
1. Ok so what is K8s ?
- K8s is just short for Kubernetes Why ? Kubernetes = k + ubernete + s. ubernete. “ubernete” has 8 characters then we have k8s 😀
- K8s take cares of:
- Auto deployment of containerized applications across different servers
- Load balancing
- Auto-scaling
- Monitoring and health check
- Replacement (if a container die → will be replaced)
- K8s must use container runtime ex docker, containderd, CRI-O,…
- Move to k8s we need to learn some new concepts
- Pod
- Node
- Kubernetes Deployment
- K8s Service
1.1 Pod
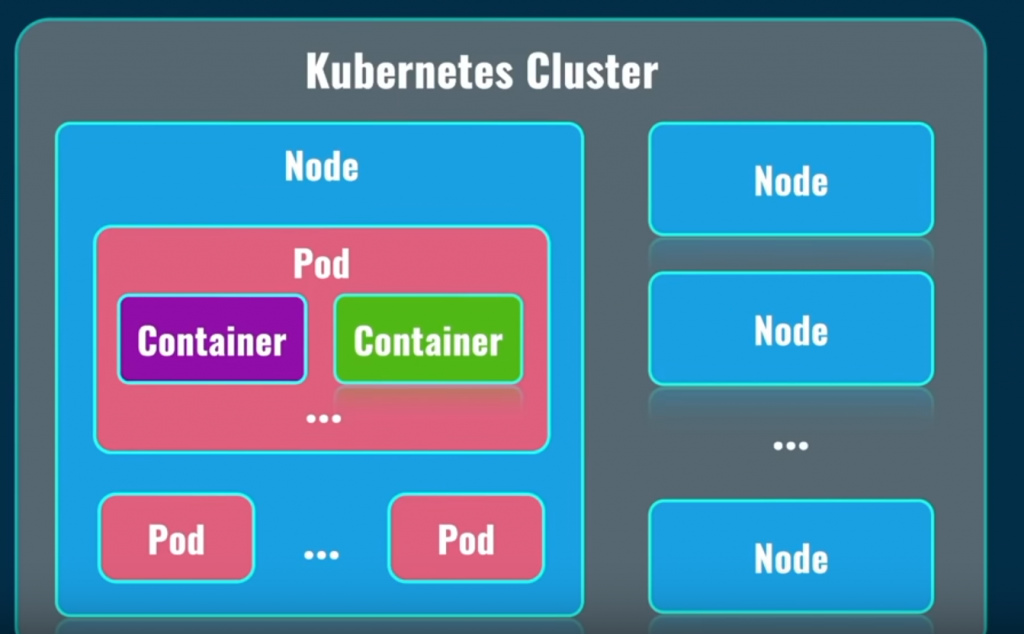
- In Docker world the smallest unit is the container. But when we move to K8s it’a new world with a lot tools, and terminologies. In the K8s world, the smallest unit is the pod (not the one to smoke lol it’s k8s pod :v). In the pod live the container runtimes. Eg you will have a pod which run a your backend express nodejs container. IN MOST USE CASE WE JUST HAVE 1 CONTAINER PER POD
1.2 Node
- Node in k8s where the pods live. (inside a node exist multiple pods). A node usually is a computer or a VM install K8s. Then when we have a collection of running nodes we now have a K8s Cluster. Now each pod at a time will leave in a specific node only. It can be move to another node (ex: when the node it live is down). This process is automatically complete by the k8s it self to make sure your application always online
- Inside each node, beside the pod to run your applications it contains a lot of other services eg: kube-proxy for network communication between and inside each nodes, and the most important is the api server so each node can sync and communicate with other and We – the devops will work with this api server to manage our cluster.
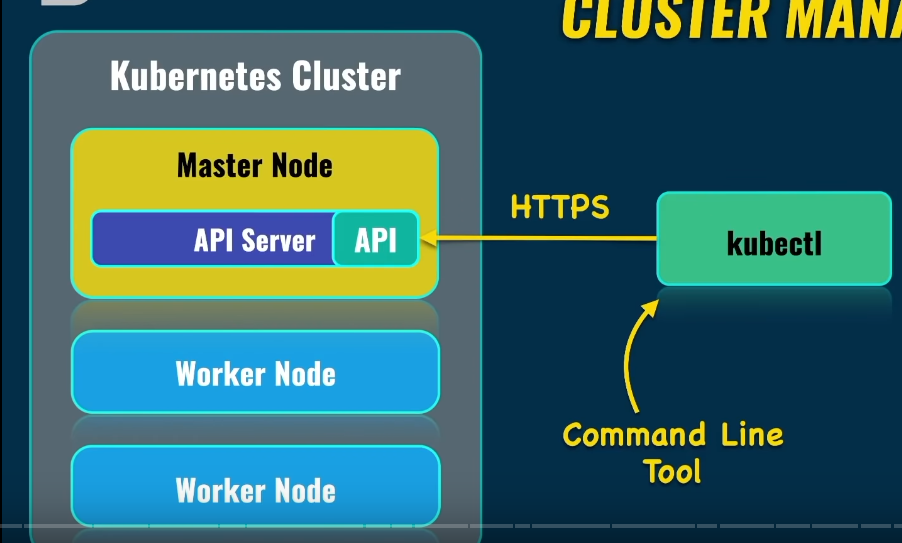
- In a k8s cluster we have 2 type of nodes. Master node and Worker Node. The master node include the control plane that manage all workers node in cluster. The worker node will run our application pods
- As i explained below, the main and most important service run in a node(more specific here is the master node) is the API server. We can use a command line tool called kubectl to connect remotely to that api server then manage the cluster. So kubectl can be installed on your local computer to connect remotely to a k8s cluster on cloud.
1.3 K8s Deployments
- Deployment is an unit of K8s to manage your pods.
- Deployment give us power to create multiple pods with the ability to increase the quantity of the pods, decrease the quantity or even change the configurations.
- Deployment is responsible for pod’s creation. All pods created by a specific deployment is the same.
1.4 K8s Services
- In Kubernetes, a Service is a method for exposing a network application that is running as one or more Pods in your cluster
- Container runtime or k8s pod it self is internal in k8s cluster if we want to accepts connection from outside. we need to use services. There are 3 type of k8s service
- Cluster Ip: the internal IP for each deployment that valid only in k8s cluster it self not the outside world So it’s best for internal communication between deployments in a cluster
- NodePort: A extended version of ClusterIP. K8s will open a port of the node machine then forward all trafic through this pod to the clusterIp that belongs to one deployment. Now we can access from outside world through <node-ip>:<port>. But this service is most use for demo purpose only
- LoadBalancer : This service will have a load balancer application live in cluster which will provide you a public IP to access to deployment. LoadBalancer services are ideal for applications that need to handle high traffic volumes, such as web applications or APIs.
- A most used in real world is the ingress which works like an nginx reversed proxy server.
- We will discuss more detail about the k8s services and networking in next part: Part 4: Networking with K8s is f***ing hard. For now just focus that we have nodeport is the easiest one to access our deployment
2. Install local k8s cluster and get used to kubectl
- There 2 options for a local k8s that help we learn how to use k8s. The microk8s and the minikube
- Minikube require the virtualization via hyper V (window) or VMbox on Ubuntu
- Install minikube: https://minikube.sigs.k8s.io/docs/start/
- In this blog i highly recommend we use the microk8s on ubuntu OS cause it more easily to install and the microk8s is still use for company solutions
- When install microk8s to your machine your machine now act like a master node of your k8s cluster
- Install microk8 on ubuntu
sudo snap install microk8s --classic
microk8s status --wait-ready
# enable some helpfull plugin
microk8s enable dashboard
microk8s enable registry- When installed successfully you can manage your k8s cluster via the kubectl. The k8s it self have it own kubectl to work with your k8s cluster. But we need to install kubectl itself too. Because this cli tool can connect to any k8s cluster even remote or local
curl -LO "https://dl.k8s.io/release/$(curl -L -s https://dl.k8s.io/release/stable.txt)/bin/linux/amd64/kubectl"
# download checksum file
curl -LO "https://dl.k8s.io/$(curl -L -s https://dl.k8s.io/release/stable.txt)/bin/linux/amd64/kubectl.sha256"
# checksum
echo "$(cat kubectl.sha256)  kubectl" | sha256sum --check # should return kubectl: OK
# install
sudo install -o root -g root -m 0755 kubectl /usr/local/bin/kubectl
# check install
kubectl version --clients- Tips: typing microk8s kubectl is too long set alias like mkctl=”microk8s kubectl”. From now on in this blog i will just use kubectl command connect this kubectl to where is base on your setup or you can use the above alias mkctl
- Now let’s learn some kubectl basic command
# get cluster info
kubectl cluster-info
# get nodes is runing
kubectl get nodes
# get pods
kubectl get pods --namespace=namespace
# get namespace. 1 node -> n pods. namespace to manage pods
kubectl get namespaces - A new thing here the k8s namespace. k8s namespace use to manage k8s entities (deployment, pod, services). Your application deployment and service should live in a namespace to manage them easily. If you not specify the namespace when you create deployment, pod,.. it will live in “default” namespace
kubectl run <pod_name> --image=<image_name> # create a pod that run nginx container from nginx image
kubectl describe pod <pod_name> # get information about a pod
kubectl delete pod <pod_name> # delete pod
kubectl create depoloyment # create a deployment
kubectl get deployments # get deploployment info- You can read more here cause this is just a quick review: https://kubernetes.io/docs/reference/kubectl/
3. First deployment
- You can create a pod that run your app container without a deployment like this
kubectl run nginx  --image=nginx
# kubectl describe pod <pod_name>
kubectl describe pod nginx- But too manage our application (scale/decrease up the pods instances,..) we can create deployment. All pods in a deployment is same (same container). You can quick create a deployment like this
# kubectl create deployment <deployment-name> --image=<image-name>
kubectl create depoloyment nginx-deployment --image=nginx

# get list running deployments
kubectl get deployments- This command will create a deploy name nginx-deployment in default namespace. To get more detail about the deployment use this command
kubectl describe deployment nginx-deployment
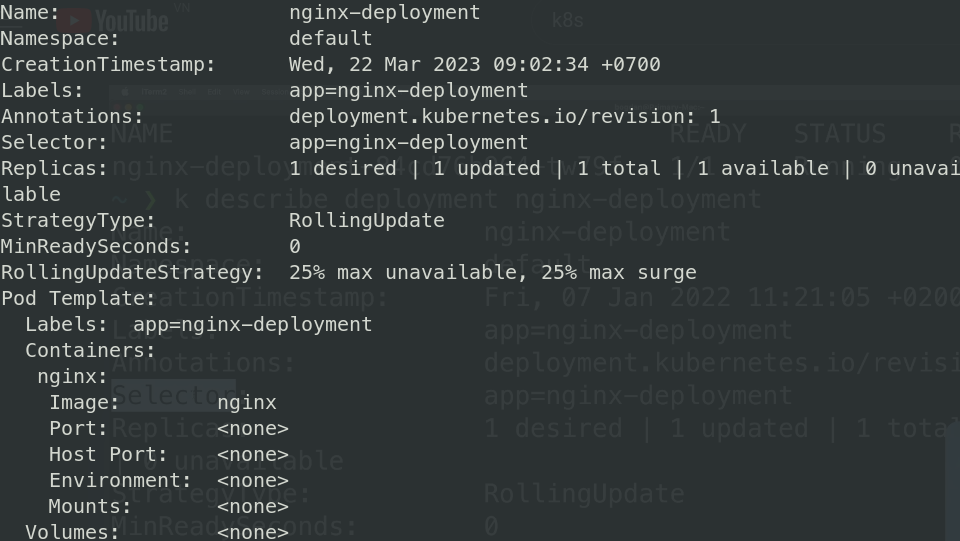
- Take a look at Selector:
app=nginx-deployment. Each entity in K8s have selector so you can point (reference) to it later. Because, to deploy a running application in real world only creating a deployment is not enough. we need also the service for that deployement the volume,..etc. And you can see the pod has the Labels: app=nginx-deployment. That how k8s now which deployment that a pod should belongs to - Now the main power of deployment: the ability to manage replicas of pods. All pods will be created across the k8s cluster
# kubectl scale deployment <deployment-name> --replicas=<quantity>
kubectl scale deployment nginx-deployment --replicas=5
Conclusion
Ok it’s just quick walk through the k8s so you can get used to some concepts. This blog is too long at the moment so if you want to see we do real stuff with k8s please read next part of this series. DevOps series “from cloud to ground” – Part 4: Deploy your express application to k8s. Thanks for reading. See you guys soon
__CodingCat__