The most difficult problem when we decide to host our own private cloud is that how can we expose our service to the outside world. Event these server’s IP addresses that we set up in previous blogs is just local LAN IP addresses (you can access to these IP addresses only if you are using same network as the servers). So how can we accept outside world traffics to our private cloud ?
Table contents
- Part 1: My first time deploy a web to a aws cloud service
- Part 2: Docker and containerization
- Part 3: K8s and the new world of container orchestration
- Part 4: Deploy your express application to k8s
- Part 5: Networking with K8s is f***ing hard
- Part 6: From the cloud to ground: Physical server setup for a private cloud
- Part 7: From the cloud to ground: Install Ubuntu Server and Microk8s
- Part 8: From the cloud to ground: Harvester HCI for real world projects
- Part 9: From the cloud to ground: Private images registry for our private cloud
- Part 10: From the cloud to ground: Accept outside world traffics via Cloudflare tunnel
- Part 11: From the cloud to ground: CI/CD with git hub runners
- Part 12: Monitoring and debugging with Open Observe and lens
Why cloudflare tunnel
By default your router block any incoming connections to your network (eg: a client from the internet try to communicate with your local server). Your router just send your packet (eg: HTTP request) to desired server and then forward the response packets from this server to your machine. That means to expose a web server we need to open a port that accept outside world traffics then do the port forwarding to forward these traffics to a server (which can handle this request). Open a port on router may be complicated and sometimes we need to work with the Internet Provider. And the most annoying thing is that our IP address will be revealed.
Cloudflare tunnel help us to solve this problem fast, simple and sercurely.
- No IP will be revealed because all traffics is first proxy by cloudflare
- Easy to setup no port forwarding or router firewall config
- Most important: It’s free :)))
How it works ?
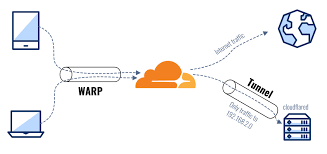
Cloudflare Tunnel work like a VPN to your local network. You install cloudflared service on one of your server in your private cloud and chose a domain name for your tunnel. Config in cloudflare to point this domain to a local lan network service. Then anytime user visit this domain cloudflare will proxy to your installed cloudflared service which live in your local network so it can find the exact local lan service to forward the traffics to.
So to work with cloudflare tunnel at least we need a domain name.
Hello outside world with cloudflare tunnel
Login to your cloudflare dashboard, and select tab zero trust. For first time setup zero trust it will ask you to enter the organization’s name. This value will be use later so please note it
Now in zero trust dashboard. Select network > tunnels > create a tunnel. Chose the Cloudflared option. Enter the tunnel name and hit the next button. Cloudflare will show the instructions to install the cloudflared service to a machine in your private cloud
If you’re using microk8s just install it to any node. If you’re using harvester HCI thing gonna be a little more complicate because Harvester is a read only OS we can not install service directly to it. (there is a work around to enable read write for Harvester) But actually we can create a VM using harvester then install cloudflared service to that VM. Now when all things done you can see your tunnel status is healthy
Now to expose a service in your local lan network just create a public hostname Tunel name -> config -> public hostname -> add public hostname
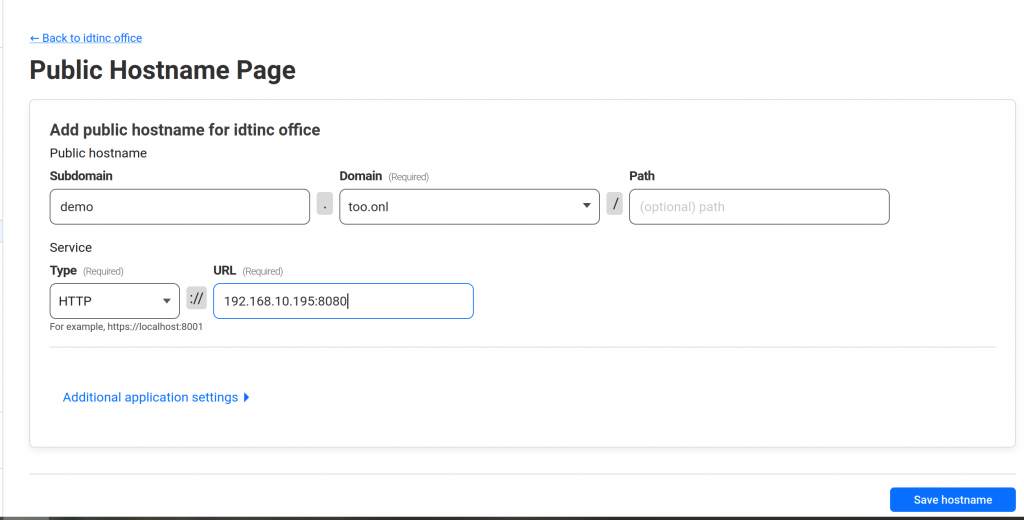
For example: http://demo.too.onl point to the service that run on 192.168.10.195:8080. Very easy right now your service is exposed.
Tips: I usually set a wildcard host name like *.my-domain.com point to the k8s IP. And use ingress to route specific subdomain to specific service in k8s eg: my cluster IP is 192.168.10.190 i point *.lilhuy-services.uk to that IP then i config my deployment service and ingress like this
---
apiVersion: v1
kind: Namespace
metadata:
  name: demo
---
apiVersion: apps/v1
kind: Deployment
metadata:
  name: demo
  namespace: demo
spec:
  replicas: 1
  selector:
    matchLabels:
      app: demo
  template:
    metadata:
      labels:
        app: demo

    spec:
      containers:
        - name: demo
          image: my-private-registry/demo
          ports:
            - containerPort: 8000
---
apiVersion: v1
kind: Service
metadata:
  name: demo
  namespace: demo
spec:
  selector:
    app: demo
  type: ClusterIP
  ports:
    - protocol: TCP
      port: 8000
      targetPort: 8000
---
apiVersion: networking.k8s.io/v1
kind: Ingress
metadata:
  name: demo
  namespace: demo
  annotations:
    kubernetes.io/ingress.class: nginx # not the public must use nginx
spec:
  rules:

    - host: "demo.lilhuy-services.uk"
      http:
        paths:
          - path: /
            pathType: Prefix
            backend:
              service:
                name: demo
                port:
                  number: 8000

---
Now to access the demo service (which run in k8s) we just need to visit the domain demo.lilhuy-services.uk. Setup by this way we can expose as many services as we want by using a single domain name.
Access your local network from anywhere with Cloudflare Warp Client
Now to access your servers (eg ssh to them) you need to use same network with these servers. To access it from anywhere we will use warp client. First setup warp client:
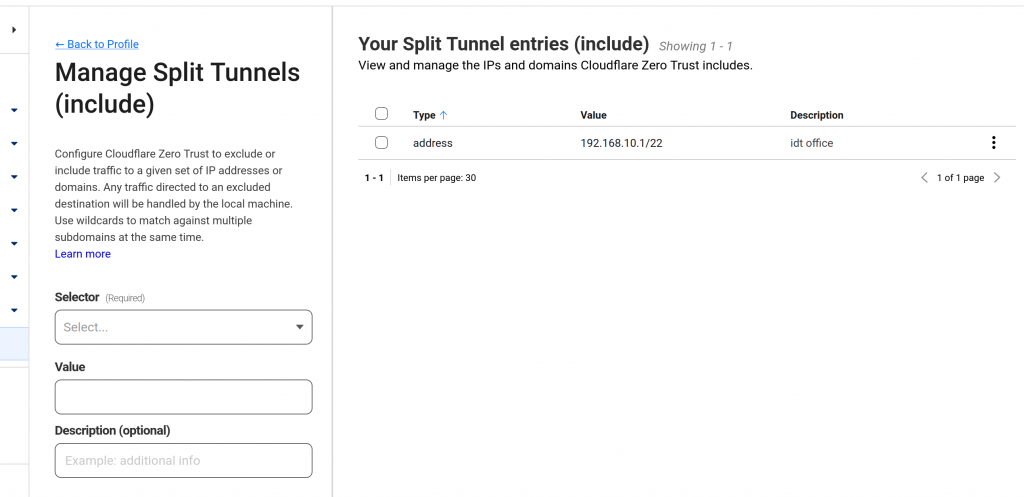
First setup private network for tunnel: Tunel name -> config -> private network -> add private network. Enter the CIDR is the router ip address with subnet for example /22 (eg: 192.168.1.1/22)
Next: Setup warp client device enrollment permissions: zero trust -> settings -> warp client. Find Device enrollment and select Manage
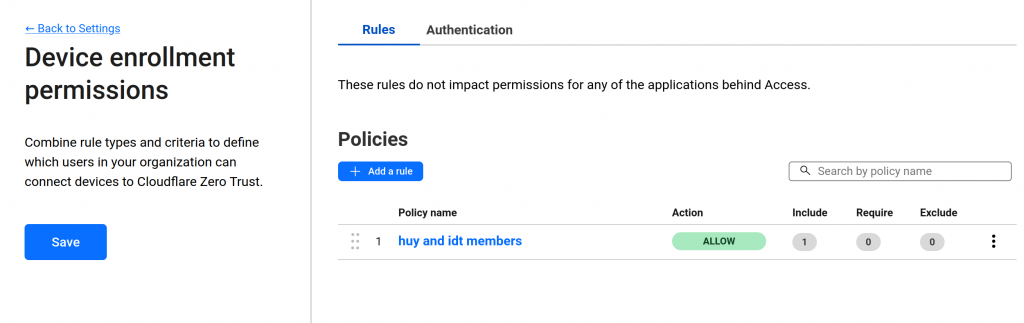
Create a policy rule to determine who is allowed to access the private network. For example, only those with email addresses ending in lilhuy.co are permitted to access the private network
Now, Setup split tunnel: zero trust -> settings -> warp client. Then find the Device settings section
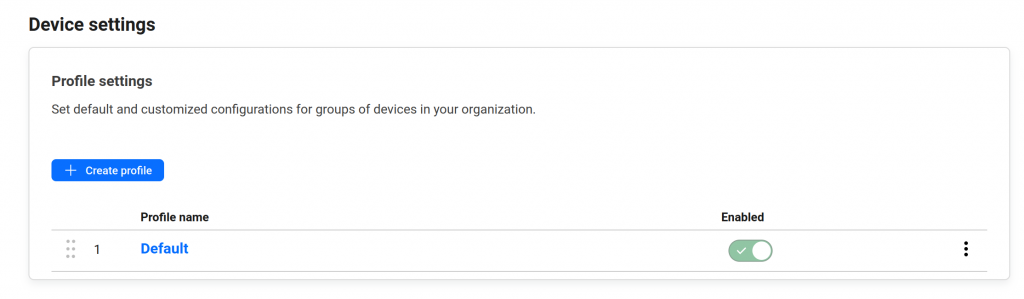
You can edit the existing default profile. In the config site find the Split tunnel section then chose: Include Ips and domains

Save the changes then hit the manage button to add the router IP
Now to access your private network your need install warp client on your machine it’s the 1.1.1.1 application:
Open the app enter the organization that we setup at below step. Then wait for email OTP and now you can access to your private network from anywhere in the world.
Conclusions and exclamations
With cloudflare we’have a nice solution to expose our service to outside world. Which is very simple to setup and sercure. We can use warp client to access our private network from anywhere. At this point you can host any service in your private cloud and use public host names to access it, nice right ? Your private cloud is now work as any public cloud service as you are used to. At this point we are at the end of the route “From cloud to ground” all services are running in your home server now not in cloud anymore :))).
This long series would end here i spent a lot of effort to complete the series at this point. All knowledge from this series is my own experience when self learn devops and when i have to install my own cloud (which use microk8s) then for my company and also other companies (which usually use Harvester HCI). If you read from the part 0 of this series to here thanks a lot and leave a comment to correct me if I’m wrong at some points.
And lastly, You thing this series is ended ? No :))) welcome to next part: Part 11: From the cloud to ground: CI/CD with git hub runners. Thanks for reading and see you soon
__CodingCat__