In last 2 blogs of this series. We’ve discovered 2 amazing tools that we can install to host our own k8s cluster for our private cloud. They are microk8s and harvester HCI. After installation, we now have a up and running k8s cluster where we can host our service. But the most important tool need to be installed to your private cloud infrastructure is a private image registry. So let’s see why we need it and how can we easily install one.
Table contents
- Part 1: My first time deploy a web to a aws cloud service
- Part 2: Docker and containerization
- Part 3: K8s and the new world of container orchestration
- Part 4: Deploy your express application to k8s
- Part 5: Networking with K8s is f***ing hard
- Part 6: From the cloud to ground: Physical server setup for a private cloud
- Part 7: From the cloud to ground: Install Ubuntu Server and Microk8s
- Part 8: From the cloud to ground: Harvester HCI for real world projects
- Part 9: From the cloud to ground: Private images registry for our private cloud
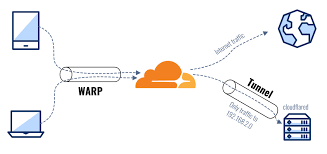
- Part 10: From the cloud to ground: Accept outside world traffics via Cloudflare tunnel
- Part 11: From the cloud to ground: CI/CD with git hub runners
- Part 12: Monitoring and debugging with Open Observe and lens
But why we need it ?
A quick recap: image registry is just a image storage some where on internet that container runtime can pull the image down for container’s creation process. By default our k8s now can pull any image from a public image registry like dockerhub. Using dockerhub is not a good solution for our private cloud where we have a lot of image and some image we don’t want to public. A Private Image registry is a image registry that you host your self. A image registry just 2 components:
- A storage driver: It can be anythings can store the files: your local file systems, aws s3, cloudflare r2, ..
- An api server so container runtime (like docker) can work with to fetch/push the image’s layers to.
Here is some options for your private image registry: microk8s built-in registry, habor(a open source registry manager that can be installed as a service in your k8s cluster), chose a storage driver and host your registry your self via the registry docker image: https://distribution.github.io/distribution/
In this blogs, I will show you how to use microk8s built-in registry if you are using mircok8s for your cluster. And I’ll show you 2 exciting options is a serverless registry with cloudflare worker and cloudflare r2. And a distributed registry with storeJ
Why not harbor ? Harbor is nice and powerful image registry it even have a feature to authorize the image (eg: only some one in team can access certain images). But habor use k8s volume to save our images that means all image layers files are duplicated cross all nodes in cluster (not disk efficient) and when all nodes of our cluster is down (for example electricity problem) it took a lot of time to restart all service dues to the image files is distributed to all cluster
Microk8s built-in registry
This one is super easy. First chose a node in your cluster to enable the registry add-ons
microk8s enable registrynow you can access your registry via <node-ip>:32000. So all your image need to be tagged with <node-ip>:32000/ so it can be pushed and pulled from this registry eg :
docker build -t 192.168.90.45:32000/hello-world .
docker push 192.168.90.45:32000/hello-world
Now if your docker daemon does not accept to pull and push from this insecure registry source. Let’s enable it by adding this line to /etc/docker/daemon.json
{
  "insecure-registries" : ["192.168.90.45:32000"]
}
Now we still need to do one thing is to config all the nodes in the cluster can pull image from this registry. Please read more at the last section of this blog
Self host an image registry with s3-api like storage driver
Using storJ
StorJ is a decentrelized s3 api like storage – A tool that solve real world problem with blockchain not like other ctypto app. The storage price on Storj is super cheap we also have 25GB free. Actually, we can use any s3 api like storage to save our image layers: aws s3 itself, minio, cloudflare r2,… But storJ is a fun choice
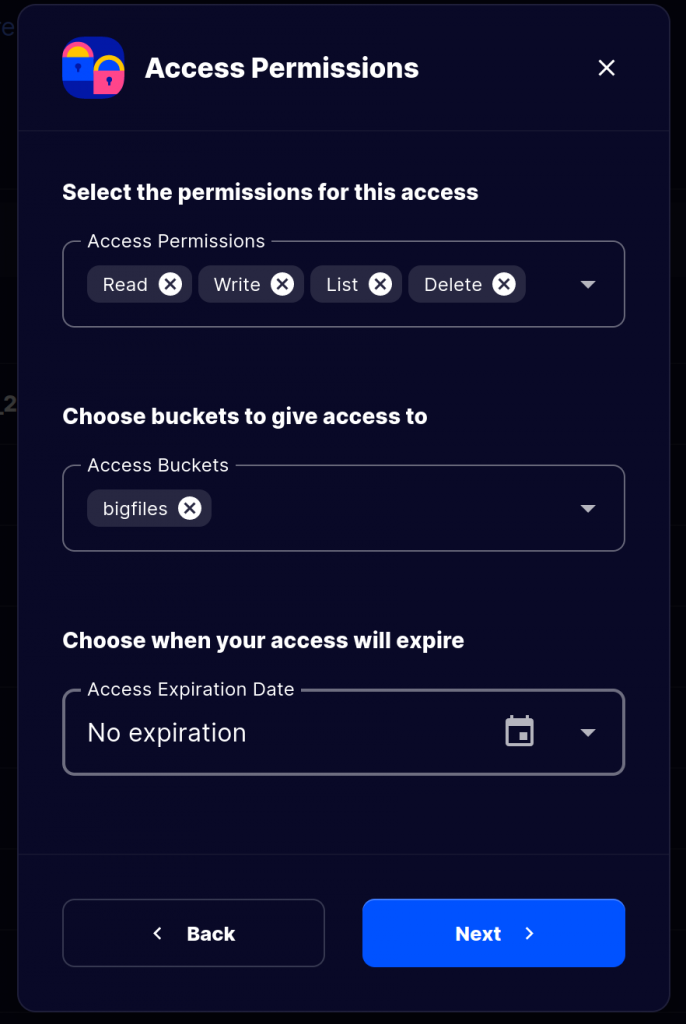
First, visit https://www.storj.io/ create an account and a bucket. Then we need to get an access grant

And give all permission for the bucket (which we wish to save our images layers) all permissions
Ok save this grant key for later use. We’ll build backand service for our image registry via this docker image: storjlabs/docker-registry. Read more here: https://github.com/storj/docker-registry. This is just a fork from the official registry image from docker. Here is how we can use it
Create a folder name registry cd to that folder cd registry/
Create a docker-compose.yml file
version: '3.8'  # Use a version compatible with your Docker Compose

services:
  registry: # This is the service name, you can customize it
    image: storjlabs/docker-registry  # Docker image to use
    ports:
      - "9999:5000"  # map port
    environment: # Environment variables
      REGISTRY_STORAGE: storj
      REGISTRY_STORAGE_STORJ_BUCKET: <your_bucket_name> # your created bucket name
      REGISTRY_STORAGE_STORJ_ACCESSGRANT: <your_access_grant>  # access grant at below step
      REGISTRY_AUTH: htpasswd
      REGISTRY_AUTH_HTPASSWD_REALM: Registry Realm
      REGISTRY_AUTH_HTPASSWD_PATH: /auth/htpasswd
    restart: always  # Optional: Ensures the container always restarts
    volumes:
      - ./auth:/auth  # Mount the host directory ./auth to /auth in the container
Now config authentication for our registry by create a password file in auth folder that later will be map volume with the running container
mkdir auth
docker run --entrypoint htpasswd registry:2 -Bbn <your_username> <your_password> > auth/htpasswd
Then run the container
docker-compose up -d
Tada you’ve built your own private registry. Now you can deploy this registry some where maybe in one of your VM in your private cloud then we can access the registry:
docker login <IP or Domain> enter the password from below steps
then to push or pull image just prefix the image tag with registry IP or Domain.
Remember this step to allow the insecure registry in case you do not install ssl certificate for your registry
{
  "insecure-registries" : ["your registry IP or domain name"]
}
Using Cloudflare r2
Any s3 storage with s3 api can be your image registry, same energy for cloudflare R2. And to pair with r2 it’s the cloudflare worker the best choice for your serverless backend. I have a blog about cloudflare worker you can read it here: http://tsmc.info/edge-computing-with-cloudflare-worker/
Ok host an image registry with cloudflare worker is super easy: https://github.com/cloudflare/serverless-registry. Just clone this repo and follow step by step the README.md file. Before doing this, we need to create a cloudflare account enable billing for it to enable the cloudflare worker and cloudflare r2 :v.
Then you just need to use the url of the worker for your image registry no need to enable insecure registry here because this domain already have cloudflare SSL certificate installed.
One important things to notice when you choice r2:
- Pushing with docker is limited to images that have layers of maximum size 500MB. Refer to maximum request body sizes in your Workers plan.
- To circumvent that limitation, you can manually add the layer and the manifest into the R2 bucket or use a client that is able to chunk uploads in sizes less than 500MB (or the limit that you have in your Workers plan).
Config k8s cluster to pull image from our private image registry
Ok, now you have a registry basically you just access it via the registry hostname (IP address or domain name). But our k8s cluster does not know to pull image from this registry yet. So here is how we can config our k8s cluster for pulling image from a private registry
For microk8s
For each node, create new host.toml file like this
sudo mkdir -p /var/snap/microk8s/current/args/certs.d/${registry-hostname}
sudo touch /var/snap/microk8s/current/args/certs.d/${registry-hostname}/hosts.toml
edit or add the files so the content look likes:
# /var/snap/microk8s/current/args/certs.d/10.141.241.175:32000/hosts.toml
server = "http://10.141.241.175:32000"

[host."http://10.141.241.175:32000"]
capabilities = ["pull", "resolve"]
Read more here: https://microk8s.io/docs/registry-private
Finally restart microk8s
microk8s stop
microk8s start
For harvester HCI
With harvester things gonna be much easier.
First go to your cluster dashboard site (by entering your cluster VIP in browser). Enter username and password to login
Then go advanced -> settings -> containerd-registry -> edit setting

In here add your registry information like hostname, full domain name, username password.
Notice: if your registry does not have ssl certificate installed please mark InsercureSkipVerify is True

Save the changes and it will be apply for all nodes in your cluster.
What’s next ?
Ok at this point you can deploy any applications to your k8s cluster with your private image registry. But now how can we share our self deployed website to other ? Now everything is local lan network we can only access our private cloud when we’re access same lan network as the cloud. So how can we expose to the outside internet. Let’s read my next blog in this series to find out: Part 10: From the cloud to ground: Accept outside world traffics via Cloudflare tunnel
Thanks for reading and see you guys soon
__CodingCat__